

Taming Cloud Costs with Infracost
Don't let the cloud get you


When we combine the cloud with IaC tools like Terraform and continuous deployment we get the almost magical ability to create resources on demand. For all its benefits, however, the cloud has also introduced a set of difficulties, one of which is estimating cloud costs accurately.
Cloud providers have complex cost structures that are constantly changing. AWS, for example, offers 536 types of EC2 Linux machines. Many of them have similar names and features. Take for example "m6g.2xlarge" and "m6gd.2xlarge" — the only difference is that the second comes with an SSD drive, which will add $60 dollars to the bill. Often, making a mistake in defining your infrastructure can cause your bill to balloon at the end of the month.

It’s so easy to go above budget.
We can set up billing alerts, but there are no guarantees that they will work. Alerts can happen during the weekend or be delayed, making us shoot past our budget in a few hours.
So, how can we avoid this problem and use the cloud with confidence?
Enter Infracost
Infracost is an open-source project that helps us understand how and where we’re spending our money. It gives a detailed breakdown of actual infrastructure costs and calculates how changes impact them. Basically, Infracost is a git diff for billing.
Infracost has two versions: a VSCode addon and a command line program. Both do the same thing: parse Terraform code, pull the current cost price points from a cloud pricing API, and output an estimate.
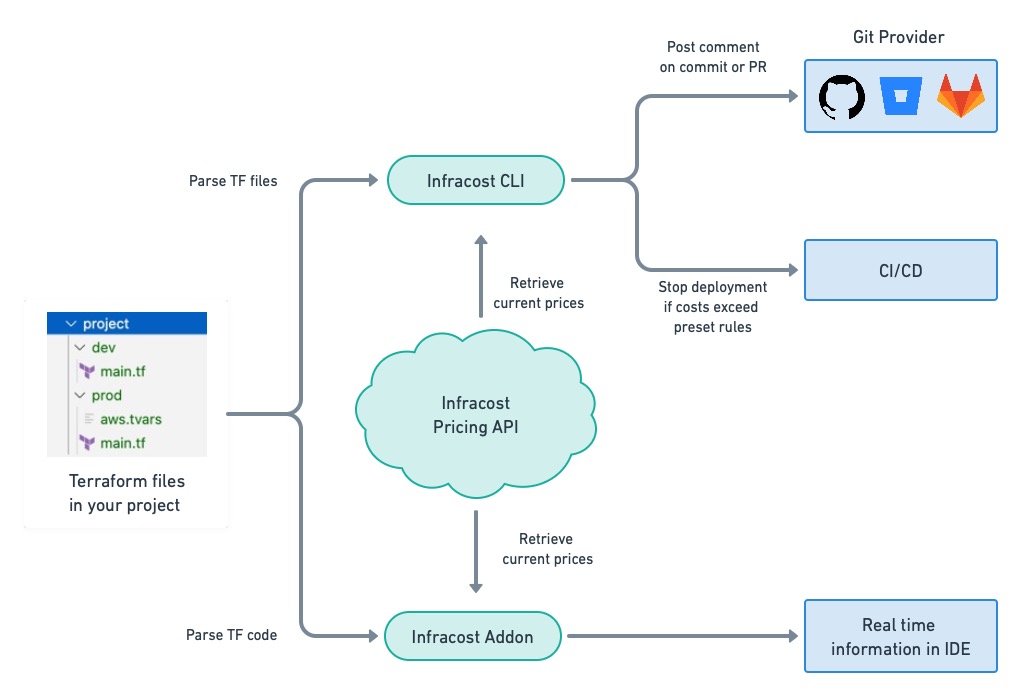
You can use Infracost pricing API for free or host your own. The paid tier includes a cloud dashboard to track changes over time.
We can see the estimates right in the IDE:
Real-time cost estimation on VSCode.
Or as comments in pull requests or commits:

Cost change information in the PR.
Infracost also has an optional Infracost Cloud, which comes with a paid tier and includes features like Jira integration, custom price books, and a dashboard to keep track of costs over time.
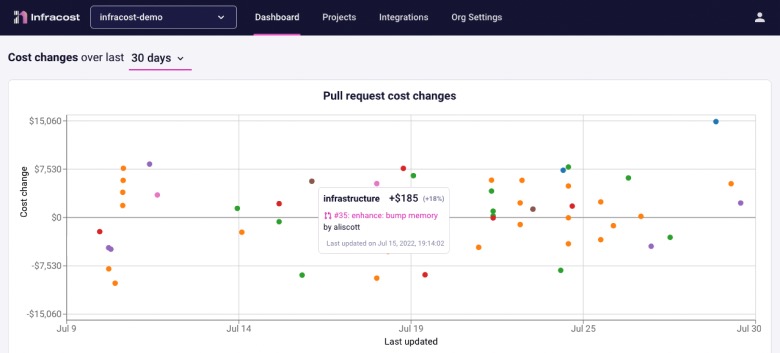
The paid tier includes a dashboard to track spending over time.
Setting up Infracost
To try out Infracost, we’ll need the following:
An Infracost API key. You can get one by signing up for free at Infracost.io.
The Infracost CLI installed in your machine.
Some Terraform files.
Once the CLI tool is installed, run infracost auth login to retrieve the API key. Now we’re ready to go.
The first command we’ll try is infracost breakdown. It analyzes Terraform plans and prints out a cost estimate. The --path variable must point to the folder containing your Terraform files. For example, imagine we want to provision an "a1.medium" EC2 instance with the following:
provider "aws" {
 region = "us-east-1"
 skip_credentials_validation = true
 skip_requesting_account_id = true
}

resource "aws_instance" "myserver" {
 ami = "ami-674cbc1e"
 instance_type = "a1.medium"

 root_block_device {
 volume_size = 100
 }
}
At current rates, this instance costs $28.62 per month to run:
$ infracost breakdown --path .

 Name Monthly Qty Unit Monthly Cost

 aws_instance.myserver
 ├─ Instance usage (Linux/UNIX, on-demand, a1.medium) 730 hours $18.62
 └─ root_block_device
 └─ Storage (general purpose SSD, gp2) 100 GB $10.00

 OVERALL TOTAL $28.62
If we add some extra storage (600GB of EBS), the cost increases to $155.52, as shown below:
$ infracost breakdown --path .

 Name Monthly Qty Unit Monthly Cost

 aws_instance.myserver
 ├─ Instance usage (Linux/UNIX, on-demand, a1.medium) 730 hours $18.62
 ├─ root_block_device
 │ └─ Storage (general purpose SSD, gp2) 100 GB $10.00
 └─ ebs_block_device[0]
 ├─ Storage (provisioned IOPS SSD, io1) 600 GB $75.00
 └─ Provisioned IOPS 800 IOPS $52.00

 OVERALL TOTAL $155.62
Infracost can also calculate usage-based resources like AWS Lambda. Let's see what happens when we swap the EC2 instance for serverless functions:
provider "aws" {
 region = "us-east-1"
 skip_credentials_validation = true
 skip_requesting_account_id = true
}

resource "aws_lambda_function" "my_lambda" {
 function_name = "my_lambda"
 role = "arn:aws:lambda:us-east-1:account-id:resource-id"
 handler = "exports.test"
 runtime = "nodejs12.x"
 memory_size = 1024
}
Running infracost breakdown yields a total cost of 0 dollars:
$ infracost breakdown --path .

 Name Monthly Qty Unit Monthly Cost

 aws_lambda_function.my_lambda
 ├─ Requests Monthly cost depends on usage: $0.20 per 1M requests
 └─ Duration Monthly cost depends on usage: $0.0000166667 per GB-seconds

 OVERALL TOTAL $0.00
That can’t be right unless no one uses our Lambda function, which is precisely what the tool assumes by default. We can fix this by providing an estimate via a usage file.
We can create a sample usage file with this command:
$ infracost breakdown --sync-usage-file --usage-file usage.yml --path .
We can now provide estimates by editing usage.yml. The following example consists of 5 million requests with an average runtime of 300 ms:
resource_usage:
 aws_lambda_function.my_lambda:
 monthly_requests: 5000000
 request_duration_ms: 300
We’ll tell infracost to use the usage file with --usage-file to get a proper cost estimate:
$ infracost breakdown --path . --usage-file usage.yml

 Name Monthly Qty Unit Monthly Cost

 aws_lambda_function.my_lambda
 ├─ Requests 5 1M requests $1.00
 └─ Duration 1,500,000 GB-seconds $25.00

 OVERALL TOTAL $26.00
That’s much better. Of course, this is accurate as long as our usage file is correct. If you’re unsure, you can integrate Infracost with the cloud provider and pull the utilization metrics from the source.
Git diff for cost changes
Infracost can save results in JSON by providing the --format json and --out-file options. This gives us a file we can check in source control and use as a baseline.
$ infracost breakdown --path . --format json --usage-file usage.yml --out-file baseline.json
We can now compare changes by running infracost diff. Let’s see what happens if the Lambda execution time goes from 300 to 350 ms:
$ infracost diff --path . --compare-to baseline.json --usage-file usage.yml

~ aws_lambda_function.my_lambda
 +$4.17 ($26.00 → $30.17)

 ~ Duration
 +$4.17 ($25.00 → $29.17)

Monthly cost change for TomFern/infracost-demo/dev
Amount: +$4.17 ($26.00 → $30.17)
Percent: +16%
As you can see, the impact is a 16% increase.
Integrating Infracost with CI/CD
We’ve seen how this tool can help us estimate cloud costs. That’s valuable information, but what role does Infracost take in continuous integration? To answer that, we must understand what infracost comment does.
The comment command takes a JSON file generated by infracost diff and posts its contents directly into GitHub, Bitbucket, or Gitlab. Thus, by running Infracost inside CI, we make relevant cost information available to everyone on the team.
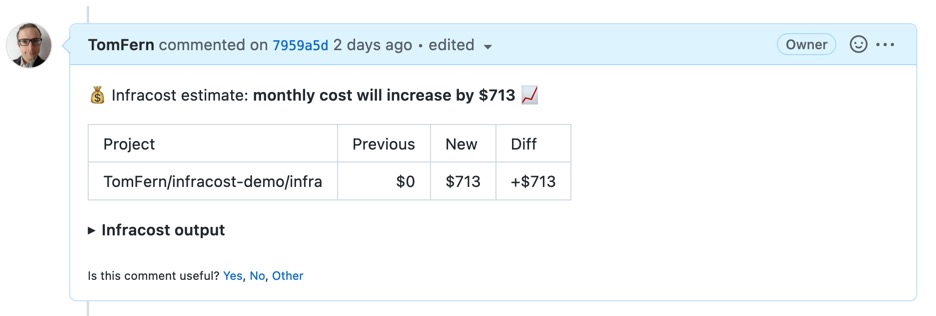
Infracost comment on the cost difference in a GitHub commit.
If you want to learn how to integrate Infracost with CI/CD, check out this tutorial: Running Infracost on CI/CD
Working with monorepos
You will likely have separate Terraform files for each subproject if you work with a monorepo. In this case, you should add an infracost config file at the project's root. This allows you to specify the project names and where Terraform and usage files are located. You can also set environment variables and other options.
version: 0.1

projects:
 - path: dev
 usage_file: dev/infracost-usage.yml
 env:
 NODE_ENV: dev

 - path: prod
 usage_file: prod/infracost-usage.yml
 env:
 AWS_ACCESS_KEY_ID: ${PROD_AWS_ACCESS_KEY_ID}
 AWS_SECRET_ACCESS_KEY: ${PROD_AWS_SECRET_ACCESS_KEY}
 NODE_ENV: production
When the config file is involved, you must replace the --path argument with --config-file in all your commands.
Establishing policies
One more trick Infracost has up its sleeve is enforcing policies. Policies are rules that evaluate the output of infracost diff and stop the CI pipeline if a resource goes over budget. This feature allows managers and team leads to enforce limits. When the policy fails, the CI/CD pipeline stops with an error, preventing the infrastructure from being provisioned.
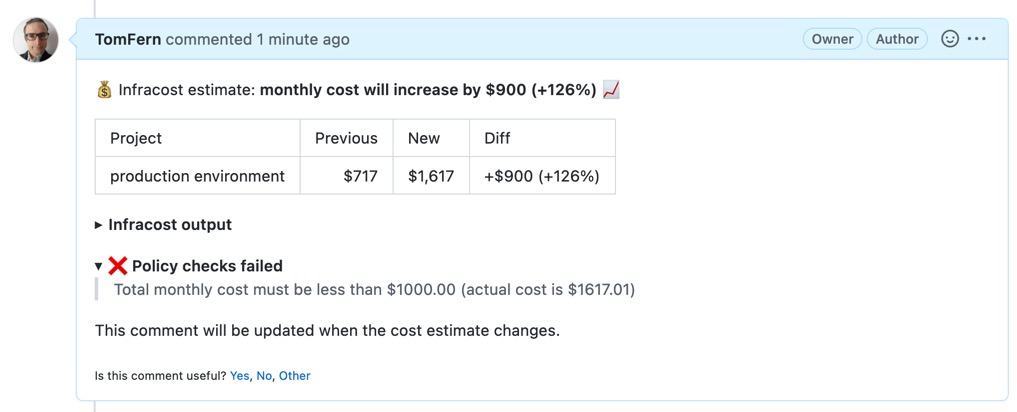
When a policy is in place, Infracost warns us if any limits are exceeded.
Infracost implements policies using Open Policy Agent (OPA), which uses the Rego language to encode policy rules.
Rego has a ton of features, and it’s worth digging in to learn it thoroughly, but for our purposes, we only need to learn a few keywords:
deny[out]defines a new policy rule that fails if theoutobject hasfailed: truemsg: defines the error message shown when the policy fails.out: defines the logic that makes the policy pass or fails.input: references the contents of the JSON object generated withinfracost diff.
The following example shows a policy that fails when the total budget exceeds $1,000:
# policy.rego

package infracost

deny[out] {

 # define a variable
 maxMonthlyCost = 1000.0

 msg := sprintf(
 "Total monthly cost must be less than $%.2f (actual diff is $%.2f)",
 [maxMonthlyCost, to_number(input.totalMonthlyCost)],
 )

 out := {
 "msg": msg,
 "failed": to_number(input.totalMonthlyCost) >= maxMonthlyCost
 }
}
This is another example that fails if the cost difference is equal to or greater than $500.
package infracost

deny[out] {

 # maxDiff defines the threshold that you require the cost estimate to be below
 maxDiff = 500.0

 msg := sprintf(
 "Total monthly cost diff must be less than $%.2f (actual diff is $%.2f)",
 [maxDiff, to_number(input.diffTotalMonthlyCost)],
 )

 out := {
 "msg": msg,
 "failed": to_number(input.diffTotalMonthlyCost) >= maxDiff
 }
}
You can experiment and try several examples online on the OPA playground. To enforce a policy, you must add the --policy-path option in any of the infracost comment commands like this:
curl -fsSL https://raw.githubusercontent.com/infracost/infracost/master/scripts/install.sh | sh
checkout
infracost diff --path . --usage-file usage.yml --compare-to baseline.json --format json --out-file /tmp/infracost-diff-commit.json
infracost comment github --path=/tmp/infracost-diff-commit.json --repo=$SEMAPHORE_GIT_REPO_SLUG --commit=$SEMAPHORE_GIT_SHA --github-token=$GITHUB_API_KEY --policy-path policy.rego --behavior=update
Conclusion
The power to spin up resources instantly is a double-edged knife: a typo in a Terraform file can be a costly mistake. Staying proactive when managing our cloud infrastructure is essential to sticking to the budget and avoiding nasty surprises at the end of the month. If you’re already automating deployment with continuous deployment and managing services with Terraform, you may as well add Infracost to the mix to make more informed decisions and impose spending limits. Setting this up takes only a few minutes and can save thousands of dollars down the road.